IC compute and storage
Welcome to a guide on compute, storage, and IT resources at IC! This guide will help you understand:
- How to use the resources.
- The guidelines one can follow within their lab that aren’t necessarily enforced by the resources, to respect each other’s project progress & effort!
This guide was adapted from the EPFL NLP resource guide, therefore it may have some information that does not exactly match your lab’s resources. Please keep an open eye for the warnings!
Table of contents
- Resource Summary
- Pre-reqs for all resources
- HaaS vs. RunAI: What should I use?
- NFS Storage
- HaaS
- RunAI
- How to ask for help
- Acknowledgements
Resource Summary
In short, you have access to 3 main resources, 2 compute and 2 storage:
- HaaS (Hardware as a Service): a machine reservation based service that allows you to work on your own reserved machine (see §HaaS).
- RunAI (CaaS - Cluster as a Service): a scheduler-based service that allows you to submit jobs to a cluster of GPU nodes alongside with a Docker image (see §RunAI).
- NFS (Network File System): chances are, your lab has a large storage service that allows you to save TBs of data (see §NFS). If you don’t, ask your PI to request one!
Note that the RunAI Scratch service is no longer available.
Pre-reqs for all resources
- Make sure to read the Tentative Lab Policy subsection of each resource before using them.
- Make sure you are accredited by your lab. You can check if you are part of the lab by looking at the people’s section of your lab’s unit information (e.g. the NLP one is here). If you aren’t accredited you should email your lab admins or PI, because it may stall you in the process of getting setup with HaaS or RunAI.
HaaS vs. RunAI: What should I use?
This is completely up to your situation:
- I need to quickly test my code on a node with GPUs:
- HaaS: If your lab has a shared machine, you could quickly test a GPU-using code on 1-2 GPUs (~12GB each). Reserving a whole machine for yourself to quickly try something may slow your process down. However, if the lab doesn’t provide such a shared HaaS machine then you will have to reserve and set it up yourself.
- RunAI: Another option is to use RunAI’s interactive mode (only one 40GB A100 GPU). Note that you can at most use only one GPU for this purpose.
- I need to parallelize a {large amount of experiments / big model}:
- RunAI: In this case, you will most likely need RunAI, as one cannot reserve a node with more than 8 GPUs in HaaS (and if you wanted exactly 8 GPUs, those machines (1) are scarcily available, you will have to reserve them ahead of time and (2) have only 12GB GPUs).
- I am starting long-term project of a few months and want a constant repo access:
- Both Haas and RunAI have access to the NFS folders, a storage service where you can directly clone your repo and make changes remotely. This way you can switch between the two resources depending on your preference.
- We suggest starting the process with the lab shared HaaS machine first.
NOTE: Please add any other cases/reasons you might choose one over the other!
NFS Storage
This section is lab-dependent. If your lab doesn’t have NFS storage, feel free to skip it. If it does, the exact folder structure may not match the examples here that are taken from the NLP lab, so be very careful and ask your lab members how you can access it and how you should be creating your personal directory. This section assumes that all of your HaaS devices are setup with a lab script that lets you login with your tequila credentials and mounts the NFS directory automatically in /mnt. If your lab setup script is not using such a system, feel free to ssh as root or the designated user account and learn from your lab members how to mount the NFS folder yourself.
NFS Setup
If you haven’t used the NFS folder before, first make sure you create a home directory in the NFS folder with the correct permissions. To do so, login to a lab-shared or your own reserved HaaS machine (see §Setting up your own machine in HaaS):
ssh <your-tequila-username>@iccluster<cluster-id>.iccluster.epfl.ch
Then go into the home directories of the NFS folder mounted on the root of the machine (not your root). Again this depends on the lab, but for NLP lab the path looks like the following, where our lab NFS name is nlpdata1:
cd /mnt/*/<lab-nfs-name>/home
Then make a directory of your own:
mkdir /mnt/*/<lab-nfs-name>/home/<your-tequila-username>
Make sure the permissions on your directory show that others can see and execute but cannot write into your directory with the group being the group identification picked by your lab. For NLP, our <lab-group> is directly connected to our unit in EPFL groups, hence it’s called NLP-unit:
ll /mnt/*/<lab-nfs-name>/home

total 1128
drwxrwx--- 15 root             <lab-group>        4096 Jan 19 16:41 ./
drwxr-xr-x  6 root             root               4096 Dec 10  2021 ../
drwxr-xr-x 25 <your-username>  <lab-group>        8192 Jan 18 17:58 <your-username>/
If the group isn’t correct (with respect to others’ group ID in the folder) you can change with:
chgrp <lab-group> /mnt/*/<lab-nfs-name>/home/<your-username>
(optional) If you would like any file or directory under your NFS home directory to not be read or executed by anyone but you (e.g. to store private keys), you can run the following command:
chmod 700 /mnt/*/<lab-nfs-name>/home/<your-username>
Now you are all setup! This is where you should keep your code, experiment logs, etc. Why?
- If you have a lab-shared machine on HaaS with more than 8 users, you will run into disk out of space issues very quickly.
- Chances are your lab is using an LDAP authentication setup for HaaS, therefore your user’s root directory in
/home/<your-username>on the local machine are not saved in snapshots. If by some accident your machine gets wiped out, your home directory contents will be gone, but the NFS storage will persist somewhere else. - This makes it easier to share files between HaaS and RunAI nodes, if you want to work with both resources and don’t want to keep cloning repos and datasets left and right.
Directory navigation
We delete the following content originally from the NLP compute guide as it is highly-lab specific. Please ask whoever is responsible of the NFS folder in your lab to understand how your it is organized and what policies you should follow. You will most likely have home directories, as well as shared directories for datasets and models.
Tentative Lab Policy
These are some policies you could follow as a lab:
- To avoid loss of data: always save your code and data in your NFS home directory
- Do not delete content in the NFS shared folders: the shared folders may contain large models and datasets shared among everybody, be very careful when you are
rm -rf-ing!
HaaS
This section goes over how to manage HaaS reservations and how to ssh into reserved machines.
Monitoring Reservations
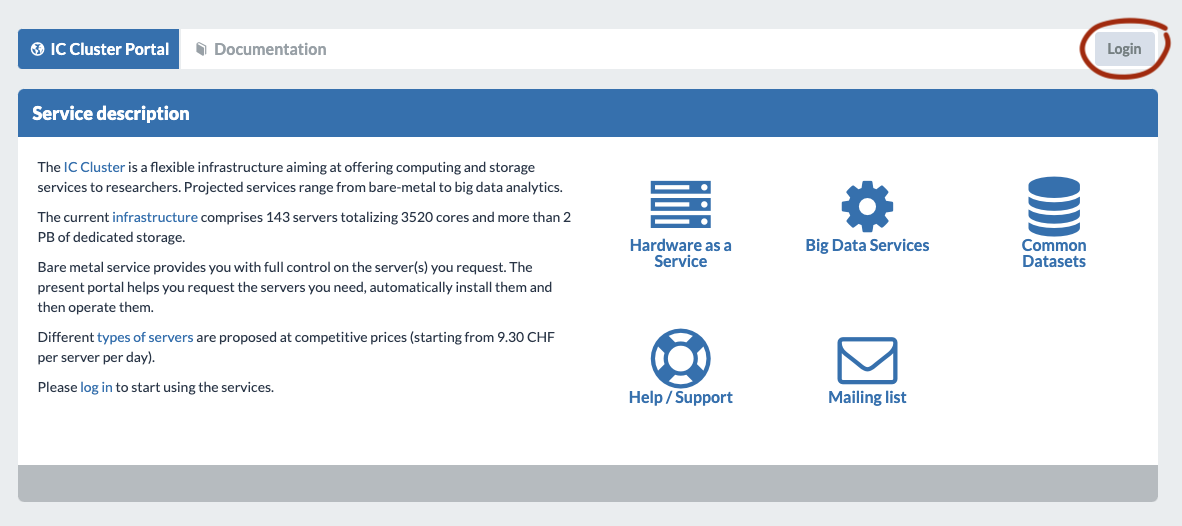
To find out which machines your lab members and you have reserved and for how long you need to first login into the
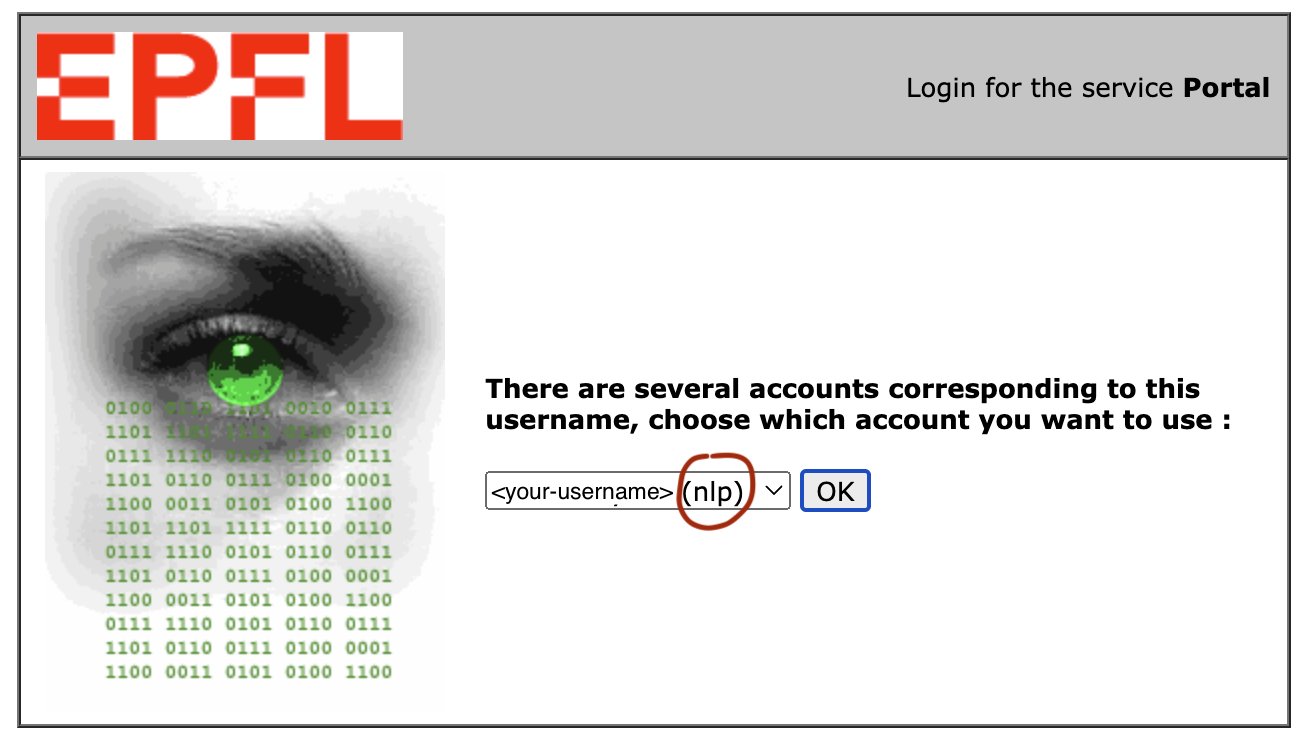
IC Cluster portal on your favorite browser. You will need to be either on-campus or be logged into the EPFL VPN. Make sure when logging in you pick your lab accreditation, otherwise you may start charging another lab you are affiliated with (e.g. picking the username option that ends with (nlp) will start charging the NLP lab’s HaaS bill). If you cannot see any options with a lab specification, you are probably not accreditted and should contact your lab administrator.
Then we would like to list all reservations ever made by people in the lab in Reservations > View my reservations:

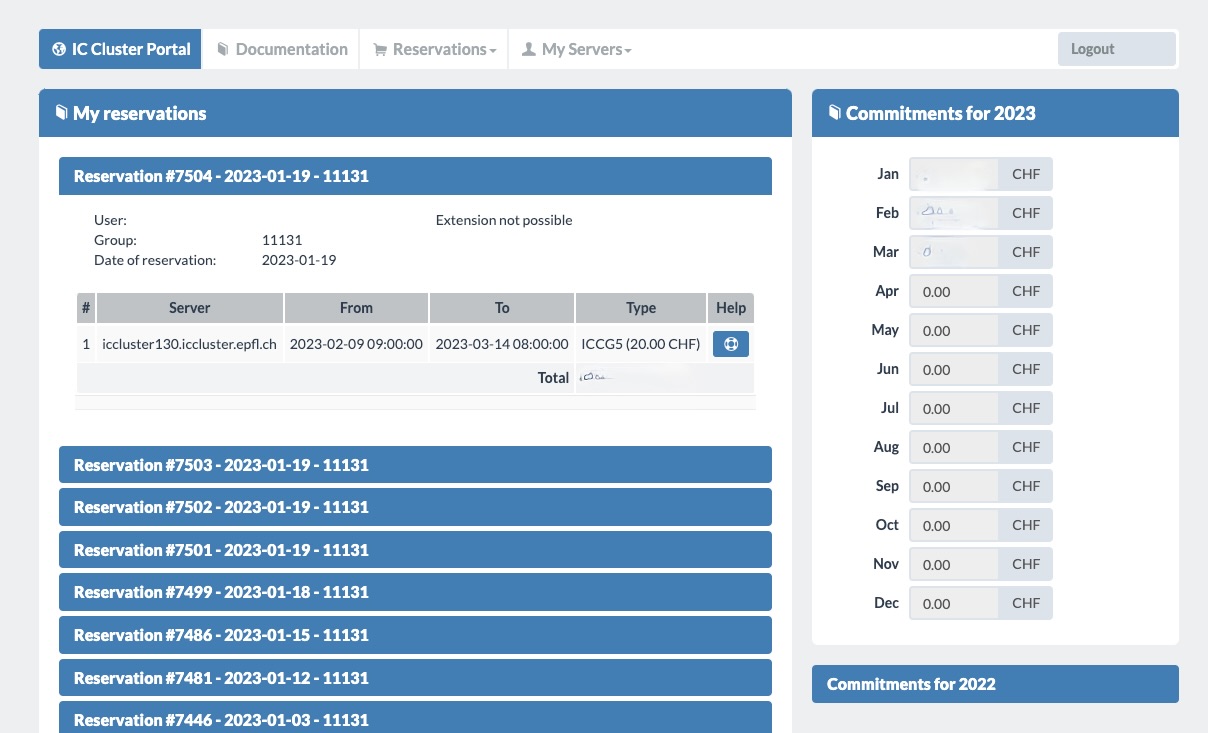
 Here on the right you can see the lab expense on a monthly basis. On the left we see every reservation ever made. Click on the blue reservation name tag to see more information. This will state 4 important things:
- User: who the reserving User is, it’s whitened out from the image for anonymity.
- Date: from and to when the reservation lasts
- Server name: server name is written as
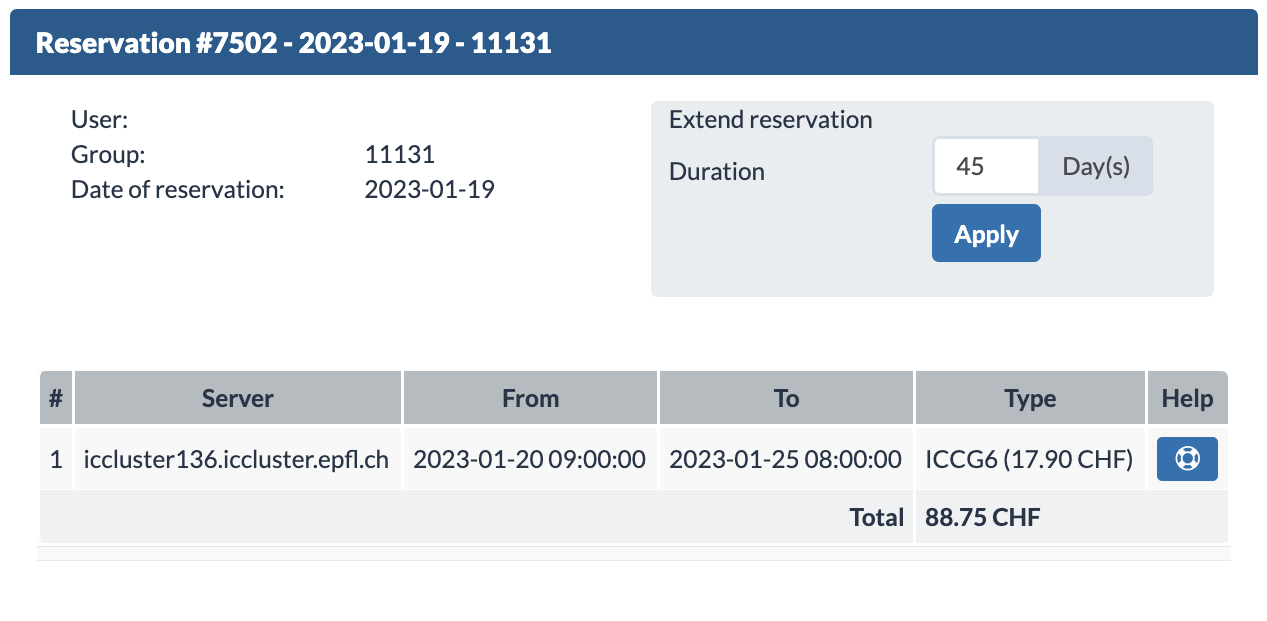
icclusterXXX.iccluster.epfl.chwhere the XXX is the server ID - Extension Option: you can also see if you can/cannot extend your reservation. Usually you will receive an email 10, 3, 1 day(s) before your reservation ends. This email from noreply@epfl.ch may go into your exchange account’s junk folder. If you extend a reservation, it will create a new reservation entry on the top of the reservation list.
To see current machines that are being reserved we go to My Servers > List:
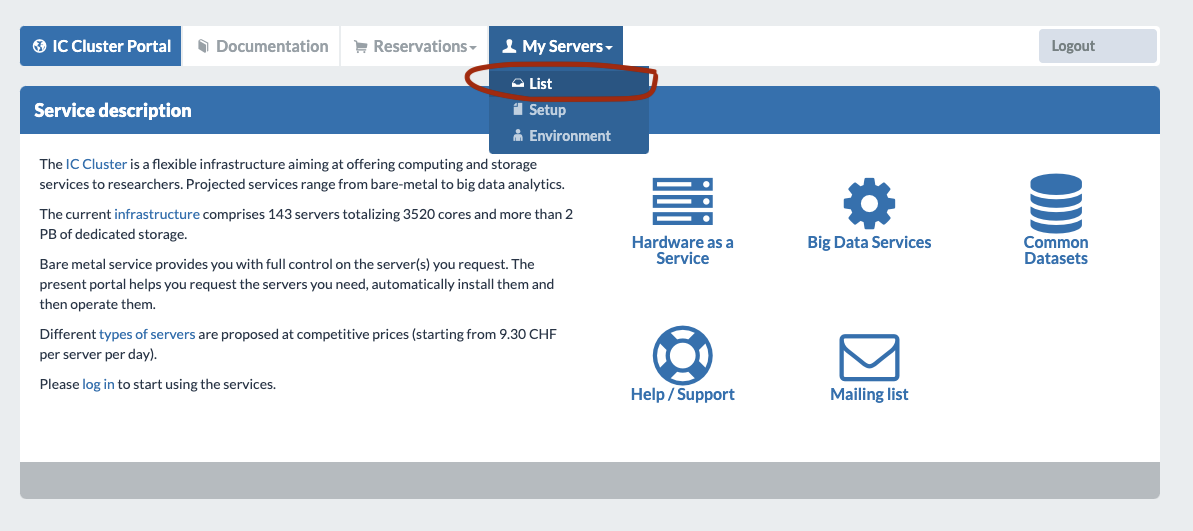
In this setting, while we can see current machines, we cannot see who reserved it. To find out which one is yours you have to use the View my reservations view. We can also see the machines’ boot status. “Boot OS from local hard disk” means there aren’t any setup processes going on at the moment.
Setting up your own machine in HaaS
Before getting into setting up your machine, ask yourself if you really need to do this. Your lab may have a lab-wide shared HaaS machine already setup for you. If you think you would like to have your personal node with uninterrupted GPUs, and RunAI isn’t providing what you would like at the moment, read on! Acknowledgement: the outline of this subsection is from the IC-IT HaaS setup tutorial
IMPORTANT NOTE: You cannot cancel the reservations yourself, if you want to terminate it early contact IC-IT (more on it in §How to ask for help). Typically, we try not to overbook due to this reason.
- Reserve the machine
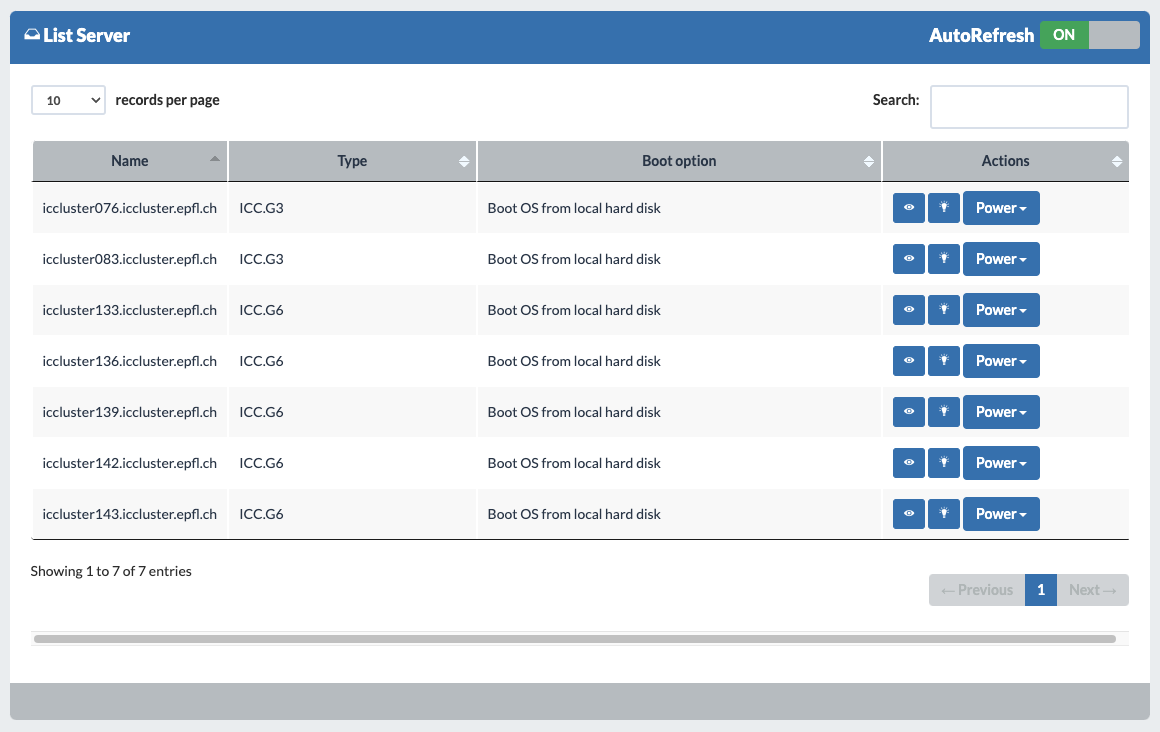
- Go to the Reservations > Make a reservation section.
- Select the date range and server type. Put 1 (or more) to the nodes you want to reserve (keep in mind that each of these nodes have multiple GPUs, the amount you put is machines, not amount of GPUs). Put 0 to those that you don’t want. Then press reserve. Once you reserve the reservation should show up in View my reservations.
- Setup the machine with your lab’s startup script
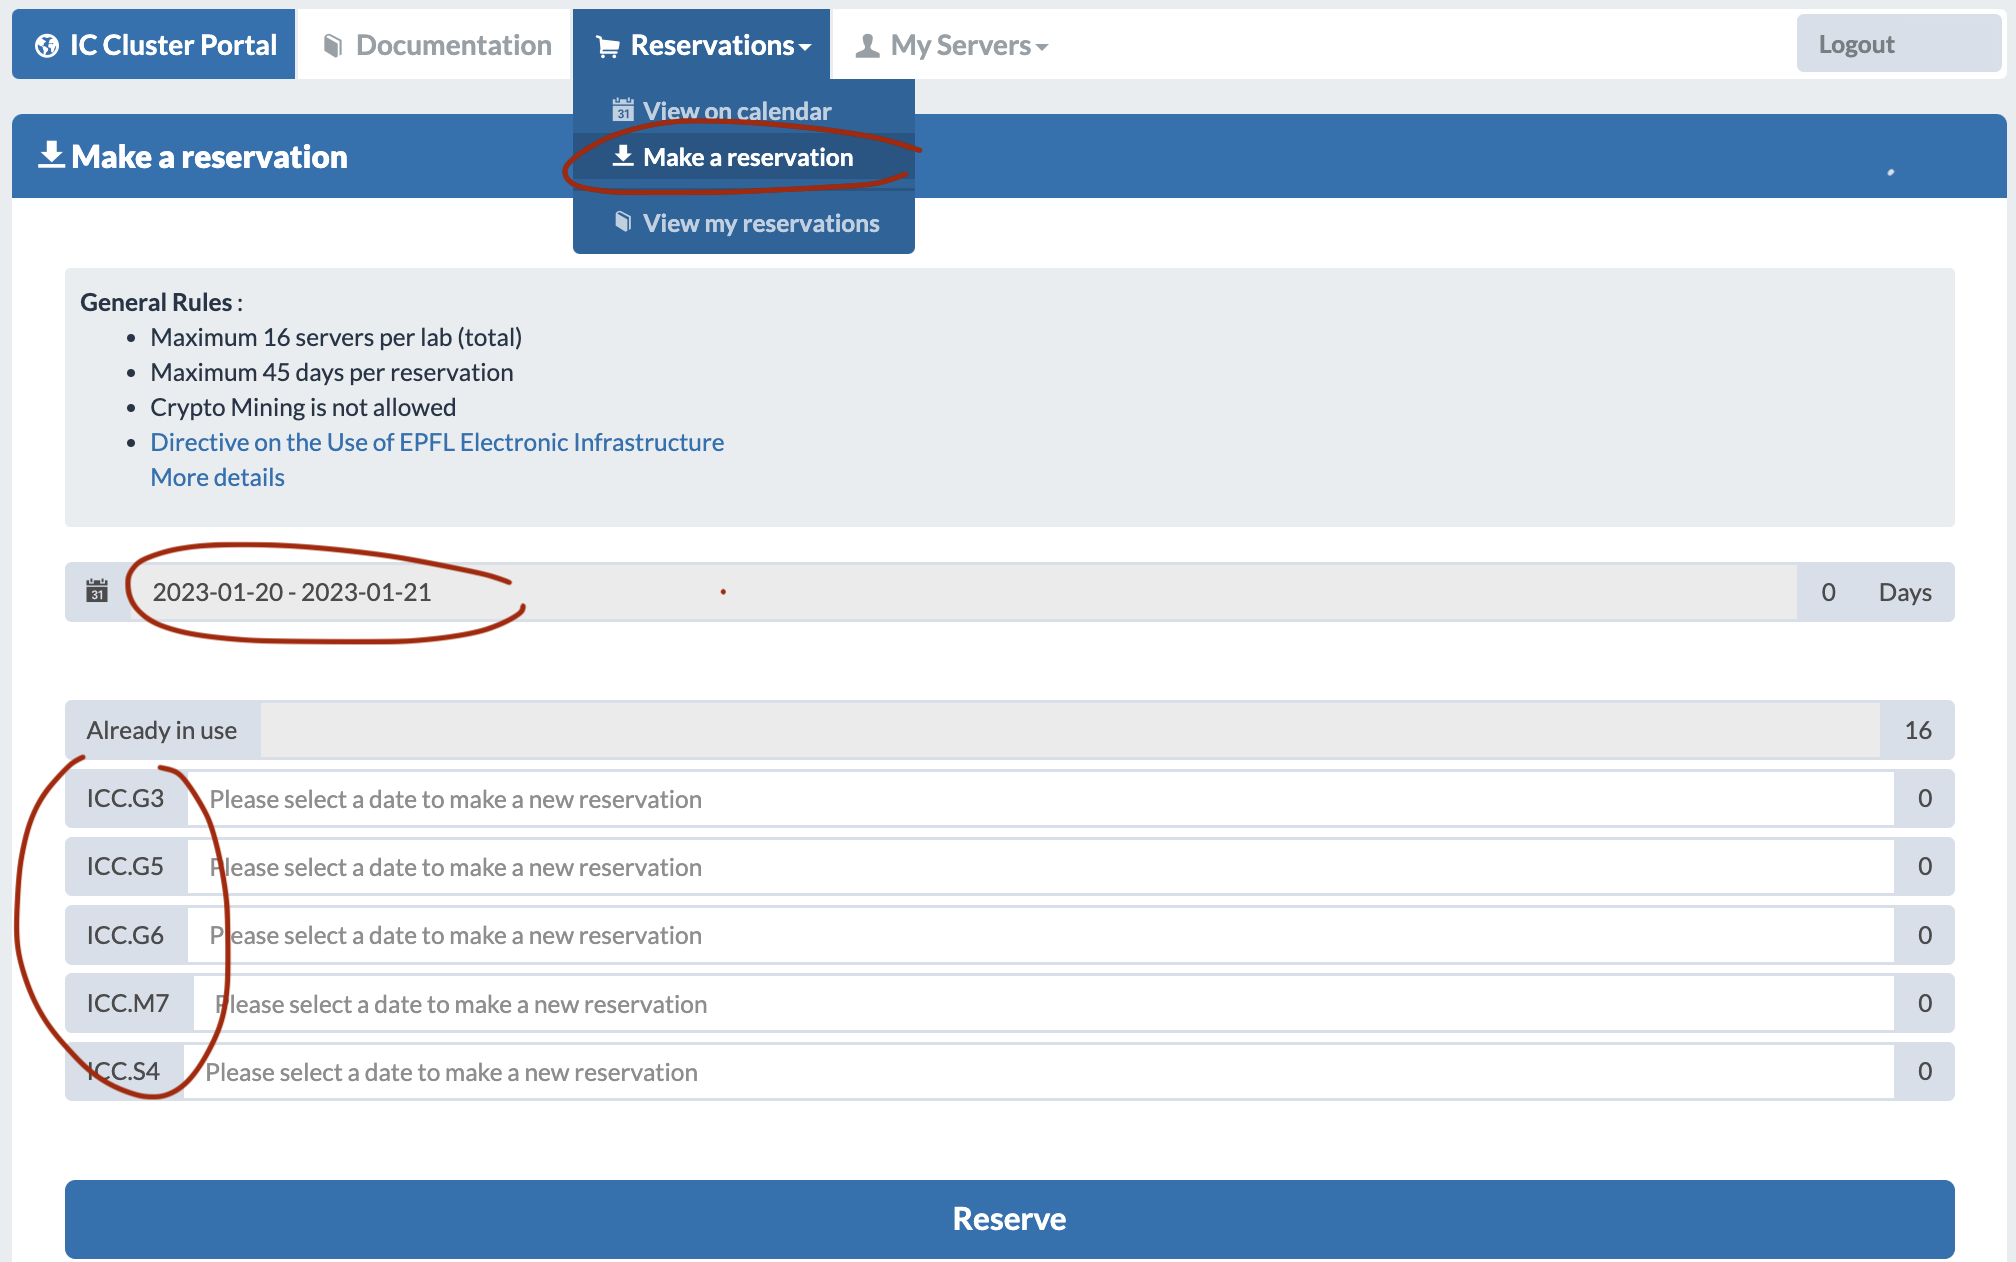
- Go to My Servers > Setup
- Put the node you want to setup into the setup list by selecting it in the available servers and then pressing “Add to the setup list”. Make sure to not put other people’s nodes in the setup list on the right! Otherwise you might wipe out somebody’s work and effort. If it’s not stored on the NFS folder, they won’t be able to get it back.
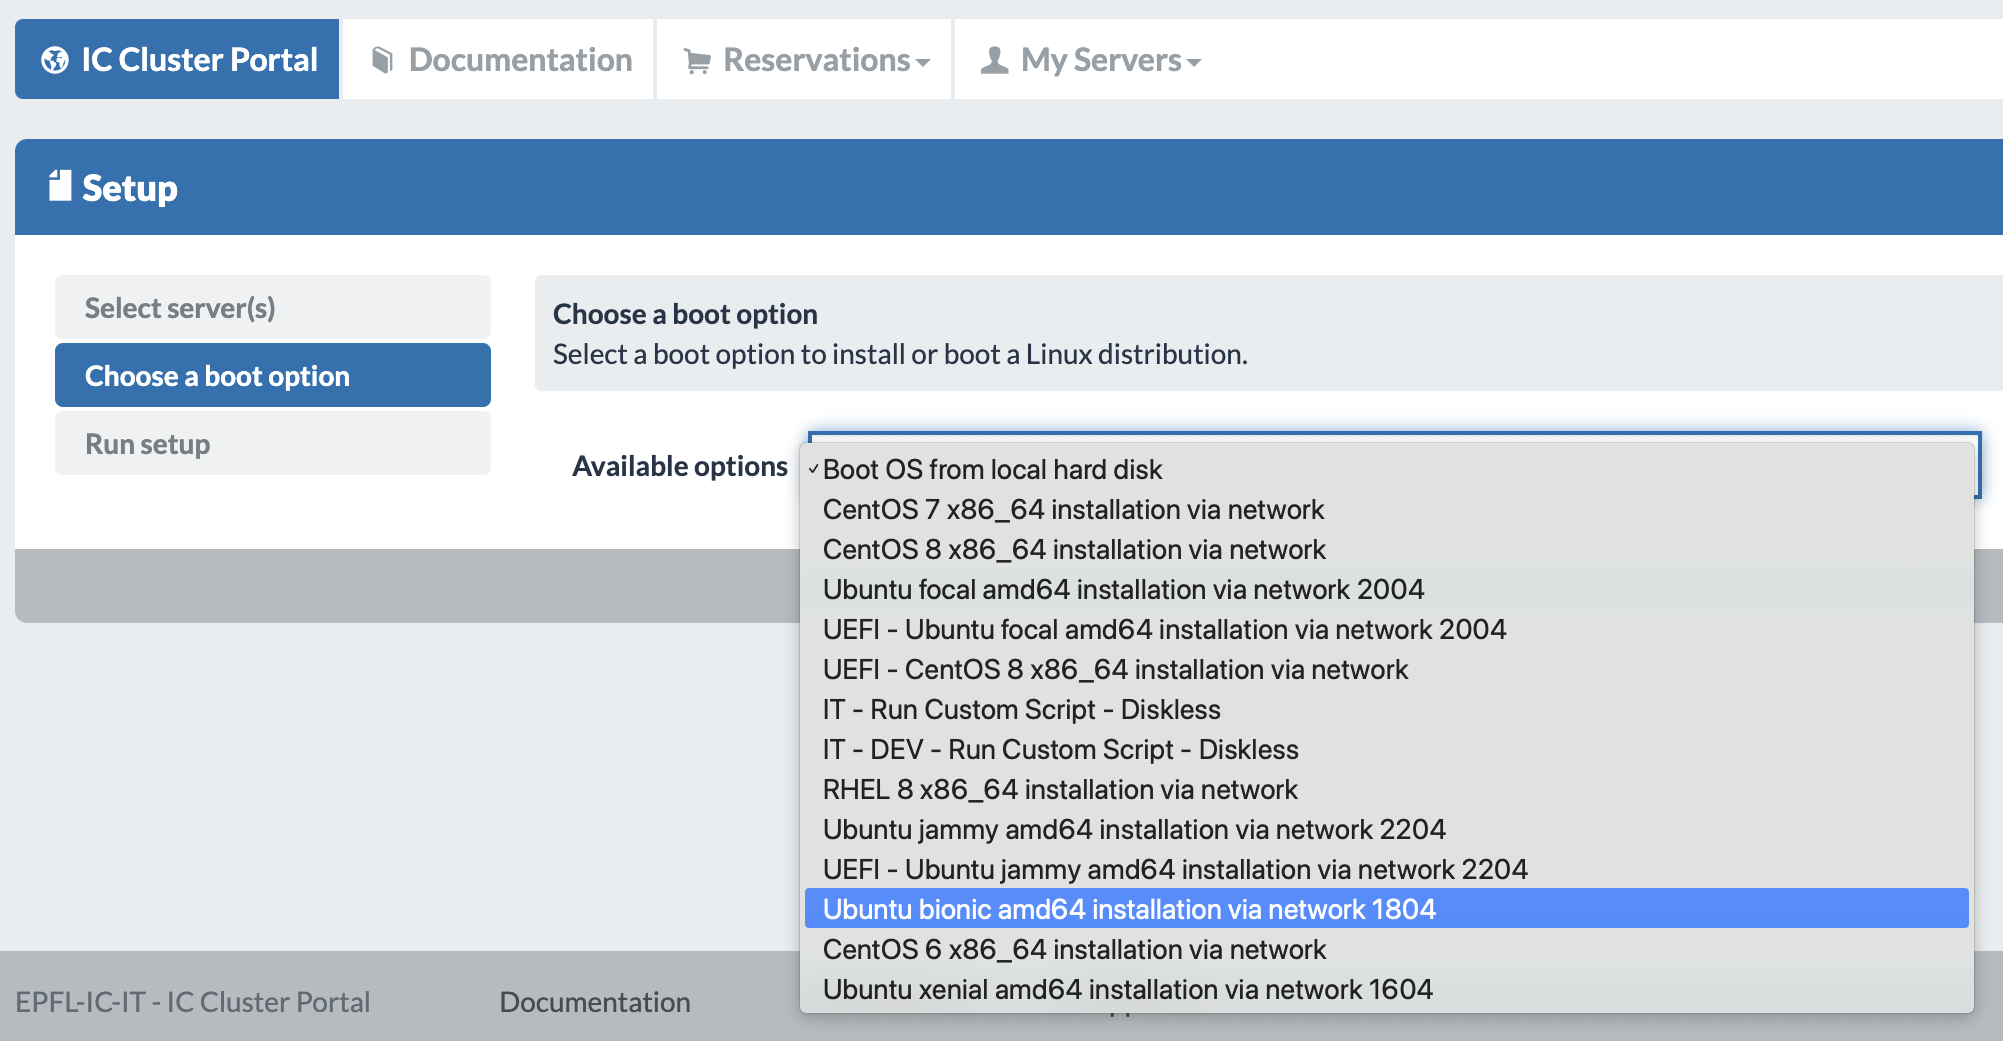
- Then we “choose a boot option”. Here we picked the Bionic 1804 OS version setup. The moment you pick the OS version a new section will pop up on the left menu called Customization.
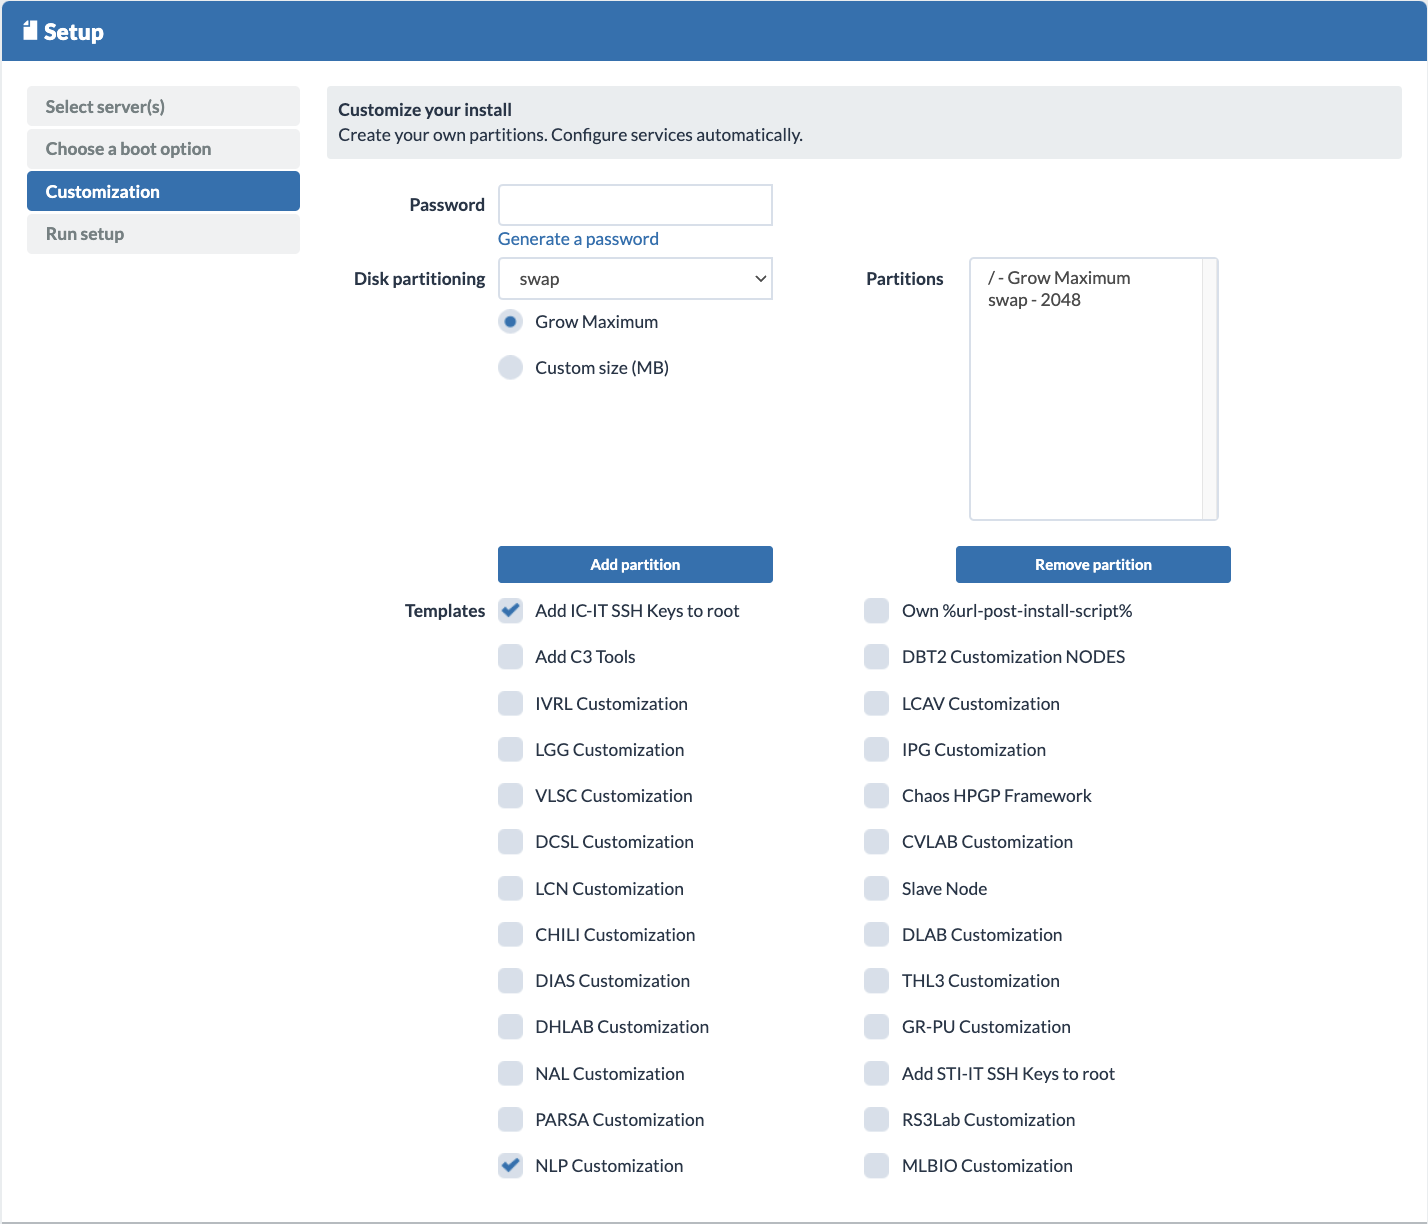
- In Customization, add a root password (optional - highly recommended if you don’t have any other user setup in the lab customization script) and tick the templates for “Add IC-IT SSH keys to the root” and your lab’s startup customization script (e.g. “NLP Customization” for the NLP lab members). Adding IC-IT SSH keys to the root can help you in case of cluster failure, this way the IC-IT team can help you by SSHing into your machine.
- Next, press on Run setup and confirm it. Keep in mind that the reset operation is not reversible and therefore if you are resetting a machine that already has data in it, it may lead to data loss.
- If you check My Servers > List again, you will see that your machine shows “… installation via network” instead of “Boot OS from local hard disk”. This means the setup is still running. Wait for the status to turn into “Boot OS from local hard disk” before attempting to ssh. If your lab’s customization script uses LDAP authentication for tequila login, then you should wait a little bit for the login authentication to be set up. This combined process should take around 30-40 minutes. From this point, you don’t have to re-setup your machine again, unless you want to wipe it.
Interfacing with any HaaS machine
Ask your lab’s members if the startup script uses an LDAP protocol or copies SSH keys of lab members. Also, ask them if the NFS folder gets automatically mounted. If so, it possibly means that:
- You can login with tequila credentials or your SSH key where
<your-username>is your tequila username. - The NFS storage may be mounted in
/mnt/**/<lab-nfs-name>(again, ask what path the mounted storage is).
If your lab’s startup protocol doesn’t setup a user, SSH keys, or your lab doesn’t have a startup script, you can replace <your-username> with root and use the password you chose at setup time.
Once you know how to authenticate, all you have to do is to ssh into the machine with the following command where <cluster-id> is the reserved node ID:
ssh <your-username>@iccluster<cluster-id>.iccluster.epfl.ch
Now you should be at /home/<your-username> or /root. Keep in mind that if you upload content here instead of a NFS folder, and your machine is reset (which can be done by someone else by accident - speaking out of experience), you will lose all progress. So if it’s possible, keep nearly all of your directories in your NFS home directory and not this local one.
Moving HaaS & RunAI cache folders to NFS
If you have a shared lab machine, it’s probably a good idea to move cache folders to your NFS home folder and to create a symbolic link to the local home folder (applies to .cache, .conda, .vscode-server - if you didn’t directly download it into your NFS folder). Don’t forget to recreate this link on RunAI entrypoints if you want to use the same cache there:
mv /home/<username>/.cache /mnt/**/<lab-nfs-name>/home/<username>/.cache
ln -s /mnt/**/<lab-nfs-name>/home/<username>/.cache /home/<username>/.cache
Disk Space Troubleshoot
If you seem to get a disk space full issue (e.g. while downloading a file, or creating a new environment), it’s most likely due to somebody (or you) storing a lot of files in their local home folder.
First check that the dev folder (responsible for local folders) is nearly completely used by running df -h or df -H. The /dev/sda1 row should have almost no availability:
Filesystem                                     Size  Used Avail Use% Mounted on
udev                                           136G     0  136G   0% /dev
tmpfs                                           28G  4.2M   28G   1% /run
/dev/sda1                                      233G  190G   32G  86% /
tmpfs                                          136G  167M  136G   1% /dev/shm
If your lab startup script uses an LDAP login system, and you are sharing the machine, you can check the usage in the local /home folder by running the du -m -s * | sort -n +0 -1 command. Or go to / and run du -sh * .??* --exclude=home --exclude=mnt | sort -n +0 -1. Then slack this owner to move their data to their NFS home folder. You can also check hidden files and folders with du -hs .[^.]*| sort -n +0 -1.
If the problem is your own directory: a solid tip is to move your cache heavy folders into NFS as mentioned in the subsection above.
VSCode for HaaS Troubleshoot
If VSCode is having trouble connecting with the cluster you may consider:
- Killing the server through the VSCode command, or you could consider removing the
.vscode-serverfolder. - Reconfiguring the host may help as well. Remove the
iccluster<cluster-id>instance in your vscode ssh config file. Then add it back with VSCode commands. - Once, an unkown extension was the problem where the user couldn’t ssh into any server (including HaaS). Try to SSH to non-EPFL servers to see if that’s the case. To get rid of the issue you may need to re-download vscode locally.
Tentative Lab Policy
- To avoid loss of data: always save your code and data in your NFS home directory
- Never reset somebody else’s machine without their permission: or in other words, always double check that you only have your machine in the setup list and that the cluster ID corresponds to the one you reserved.
Ask your lab members what the policy for shared machines is, if there are any.
RunAI
There are 2 ways you can connect with RunAI:
- Locally by setting up the RunAI command-line interface on your machine (see §Setting up RunAI on your own machine).
- By setting up the RunAI command-line interface on a HaaS machine. Check if your lab has already installed RunAI packages for a shared machine, it may help reduce the effort (see §Setting up RunAI on your a HaaS machine).
Request Access & Confirm
- In order to use RunAI you have to first request access from the runai admins of your lab (i.e. you probably need to be added to an EPFL group by whoever is responsible for it). Contact them to be approved. This will be only a one time thing!
- You can check who the admins are and verify whether you’ve been approved by finding the group
runai-<your-lab-name>on the EPFL group directory (e.g.,runai-nlp). - Once you get added, you are granted access to one project called
<your-lab-name>-<your-tequila-username>(e.g.,nlp-<your-tequila-username>).
- You can check who the admins are and verify whether you’ve been approved by finding the group
- If you get this access and your lab includes everyone in this RunAI group to have access to Harbor, then you should be able to login to Harbor (using your tequila credentials), where we push built Docker images. If for some reason you don’t get access, message one of the runai admins of your lab.
Monitoring Department-wide RunAI Usage
Once you have access you can monitor RunAI node and GPU usage through the dashboard at https://epfl.run.ai/.
Setting up RunAI on your own machine
- Install the following pre-requisites:
- kubectl from their website or if you have brew:
brew install kubectl - Helm from their website or if you have brew:
brew install helm - Run:AI CLI (Command Line Interface) from the dashboard on the top right help icon (?) > Researcher Command Line interface. Keep in mind that the binary download option may need security bypassing. So we recommend the
wgetcommand option instead. If there is a certificate expiry problem, consider adding the argument--no-check-certificateto thewgetcommand. Then follow the instructions on the RunAI website. You just need to read the “Install Run:ai CLI” section. If you run into other problems, more information can be found on the same page. - Docker from their website or through CLI for ubuntu.
- kubectl from their website or if you have brew:
- Then complete authentication with both Run:AI CLI and harbor.
- Download the EPFL kubernetes config file and move it to
~/.kube. - Export it with :
export KUBECONFIG=~/.kube/config - login to RunAI with your tequila credentials - the following command will require to paste an access key from the temporary URL it gives:
runai login - configure your project and verify your user and project:
runai config project <your-lab-name>-<your-tequila-username> runai whoami runai list project - login to EPFL’s docker (Harbor) via tequila credentials:
docker login ic-registry.epfl.ch
- Download the EPFL kubernetes config file and move it to
Now you should be all set!
Setting up RunAI on a HaaS machine
First, check-in with your lab members if RunAI prerequisites are already installed on a shared machine.
If not, follow the same steps as setting it up on your personal machine BUT:
-
If you are downloading the pre-requisites to your local home folder, consider creating a folder that you can add to your path such as
mkdir -p ~/.local/binand move the pre-requisites in there withmv ./<prereq> ~/.local/bin/<prereq>, where<prereq>can bekubectl,runai, orhelm. -
For docker on the other hand, if you have reserved your own machine make sure to download docker as root or a sudo user. If you also want your user to have docker access add yourself to the docker group with
usermod -aG docker <your-username>. Double-check you’ve been added withgetent group <group-name>orgroups <group-name>, where<group-name>isdocker. Once you’ve done this, you will have to reboot the machine withsudo rebootor the “Power Cycle” option in the portal My Servers > List Server section, which should take around 1 minute. If interaction seems laggy after the reboot, re-reboot. As IC-IT once told us: “never underestimate the power of a boot”.
Usage
There are two session modes to submit a job to RunAI. These are (1) training and (2) interactive schedules.
-
Training: Training sessions are unattended long training runs. You prepare a self-running workload (e.g.
docker/entrypoint.shin the docker template file provided below) and RunAI sends it for execution. If there aren’t enough available nodes and your lab has exceeded its maximum guaranteed 28 GPUs quota, then the RunAI software can pause/preempt your session and resume from a checkpoint, if you have coded checkpoint handling as shown here. Otherwise your job will restart from scratch as said on the website:A Run:ai unattended workload that is resumed, will run the same startup script as on the first run. It is the responsibility of the script developer to add code that: (1) Checks if saved checkpoints exist (see above) (2) If saved checkpoints exist, load them and start the run using these checkpoints.
Read also the following information on train sessions here.
-
Interactive (i.e. Build): The interactive/build mode will only be available to you for 12 hours and there is a limited count per lab. The GPU limit for the interactive mode is 1. This is perfect for interactive sessions such as bash or Jupyter notebooks that require some temporary GPU access. Read the following information on build sessions here.
While these modes have different implications, they can be run the same way:
- Write a Dockerfile to create an image. You can imagine this image as a snapshot of a virtual machine environment. It helps with two things:
- It helps specify what OS, CUDA and dependencies you want the RunAI node to have.
- It also allows you to preemptly specify an
entrypoint.shfile that gets run once the image is pulled to the RunAI node. You can overwrite this later with therunai submitcommand arguments. - More info on how to write a Dockerfile in §Writing a Dockerfile. This section will include two example Dockerfile-s with bash scripts that contain the commands below.
- Build the docker locally. You can specify a version of the image by pushing it with a tag so it doesn’t overwrite your latest one by adding
:<image-tag>at the end of your registry URL (if not, the default tag islatest). You don’t need the--secret argumentif you have nothing to hide from the EPFL community (e.g. API access keys, emails, passwords etc.). Note that<your-project-name>here is something you pick for the specific research project you are working on, it’s not the RunAI project name:docker build -f Dockerfile -t ic-registry.epfl.ch/<your-lab>/<your-username>/<your-project-name>:<image-tag> --secret id=my_env,src=.env .Note that the docker builds each instruction one by one. If one of them fails, it caches the ones that already ran successfully. The duration of building the docker depends on a lot of factors. If you use the NFS folder to not clone your repository or download the data from a link, you may save up a lot of time.
- Push the built image to the remote Harbor. Remember to push it with a tag if you specified one at build time. Make sure that you have run
docker login ic-registry.epfl.chbefore doing the push:docker push ic-registry.epfl.ch/<your-lab>/<your-username>/<your-project-name>:<image-tag> - Submit the job. Choose the type of node you would like to use and submit your job. There are two ways to do this.
- If there are too many arguments, you can use this yaml file provided by IC-IT and submit with
kubectl create -f example.yaml -
(More common) with the
runaicommand. We encourage you to checkout thelaunch.sh(recommended) orsubmit.sh(detailed) file in the docker folder we provide you in the §Writing a Dockerfile section. More on the arguments in the runai docs:runai submit \ --name <your-job-name> \ # specify your job name -i ic-registry.epfl.ch/<your-lab>/<your-username>/<your-project-name>:<image-tag> \ # specify the harbor image to use --gpu 1 --cpu 1 \ # specify amount of CPUs or GPUs needed --pvc <your-pvc>:<your-mount-dest> \ # if you need to mount a persistent volume (e.g. NFS) specify which one + where to mount it after the colon, to find out your pvc name, see "kubectl get pvc" in §useful-runai--kubectl-commands --node-type G10 # specify node type, options shown at https://icitdocs.epfl.ch/display/clusterdocs/Servers+Details # --interactive -- sleep infinity => makes it interactive and stops from logging out # --attach => if you get sleep infinity deprecated error you might just need to do attach and remove “-- sleep infinity” # --command -- run.sh => overrides entrypoints specified by the docker image
- If there are too many arguments, you can use this yaml file provided by IC-IT and submit with
Writing a Dockerfile
“Docker can build images automatically by reading the instructions from a Dockerfile.” - Docker website.
Your dockerfile can drastically change if you want to mount your NFS folder onto it. The primary reason is that your NFS folder requires permissions with your username, user ID, and group ID. For this reason, consider:
- With NFS: you can download the template docker folder zipped at docker_with_nfs.zip
- Without NFS: for a docker image without the NFS setup, simply remove all instructions from the
Dockerfilethat involves setting up the user.
For this section, checkout the Dockerfile in the template folder and carefully read the following.
- Docker instructions: To understand these instructions, please read through the docker file and the comments.
- Group permissions: If you don’t care about mounting the NFS volume to your runai job, this bit is not relevant. Otherwise, if you want to change the Dockerfile drastically, remember that you should always have the correct group permissions to access the NFS folder. Look at the setup user profile section of the docker file to understand how to do this.
- Secrecy with the .env file: Passing arguments to the docker build command doesn’t hide the variables in the built image (which will be available to everyone at EPFL). For this you have to follow the convention given in the Dockerfile example, where you preceed the RUN command that uses secret information with
--mount=type=secret,id=my_env source /run/secrets/my_env.RUN --mount=type=secret,id=my_env source /run/secrets/my_env && \ git clone https://${GITHUB_PERSONAL_TOKEN}@github.com/${GITHUB_USERNAME}/<repo-name>.gitand your
.envfile should contain each secret variable in ${} in the command above as shown here:GITHUB_PERSONAL_TOKEN=<your_github_access_token> GITHUB_NAME="Firstname Lastname" GITHUB_EMAIL="youremail@email.com" GITHUB_USERNAME="<your_github_username>"Then you can finally pass the secrets to the build command as shown in
build.shindocker/build.shwith the argument:--secret id=my_env,src=.env . - Rerunning Docker build from a certain instruction with dummy args: There can be instances where you would like to rebuild the image from a certain instruction in the Dockerfile. For example, if you would like to re-pull a certain branch of your github repository. As far as we know, docker doesn’t provide such an argument. In this case, similar to how we do in the Dockerfile, you would have to create a dummy arg at the desired point of rebuild, which gets passed to the build command with the argument
--build-arg DUMMY=''. This will force docker to rebuild your image.
Other useful links for Docker:
- Docker ARG, ENV and .env - a Complete Guide
- Getting Started with Docker
- Docker Tutorial for Beginners
- Docker with Run:ai
Useful runai / kubectl commands
All the specific runai CLI commands are described in this reference. Here are some of the most useful ones.
- To list which jobs are running:
runai list jobsIf you want to check this frequently (e.g. every 2 seconds), you can use the watch command
watch runai list jobs - To display the details of a workload:
runai describe job <job-name> - To display the logs of a job:
runai logs <job-name> - To suspend/resume the job:
runai suspend <job-name> runai resume <job-name> - To delete the job permanently:
runai delete job <job-name> - To list which persistent volumes are available to your project:
kubectl get pvc -n runai-<your-lab-name>-<your-username> - To get a bash session inside a running job:
runai bash <job-name>
NOTE: For the following subsections, we encourage you to add other valid methods to have interactive Jupyter notebooks, as well as VSCode tips.
VSCode for RunAI
To interact with your interactive job through VSCode, make sure the entrypoint command in the Dockerfile points to ENTRYPOINT ["/usr/sbin/sshd", "-D"] (if you are using interactive mode as root) or ENTRYPOINT ["/bin/bash"] (if you are using interactive mode as a user)
- Install the Kubernetes extension on VSCode.
- Select Kubernetes on the sidebar, under it :
generic-runai-context ├─ Workloads │ ├─ Pods │ │ ├─ <your job name> - Right click the job and select “Attach Visual Studio Code”
Other useful tool incorporation with RunAI (e.g. VSCode for interactive mode, Jupyter notebook forwarding etc.) can be found in their docs here.
Interactive Jupyter Notebook for RunAI
One way to have an interactive jupyter notebook on RunAI is by forwarding ports with kubectl manually.
- Don’t forget to provide the necessary interactive flags in your runai submit command:
--interactive --attach - Find the name of the pod you want to do port forwarding:
kubectl get pods - Perform the port forwarding (kubernetes docs):
kubectl port-forward <name_of_pod> 8888:8888- The syntax is Local port number : Remote pod port number
- You can check if port 8888 is already in use with lsof -i :8888 on local machine
- If port 8888 is already in use, you can use a different port
- If you wish to spawn Jupyter notebook on a different port on the remote pod, use jupyter notebook –port 1234
- Access your pod with a bash session:
runai bash <name_of_pod> - Start the Jupyter notebook on remote pod:
jupyter notebook --port 8888
How to ask for help
We all get stuck! There are two main resources to get unstuck, contact IC-IT support or ask people in the lab. Chances are, they have ran into the same problem before you or have a slack channel dedicated to such IT issues.
When contacting IC-IT, always email support-icit@epfl.ch instead of the 1234 support email. This will make your request directly go to the IC-IT staff instead of the EPFL-wide IT staff:
-
Do Not-s: If you have multiple problems, do not submit them all in the same ticket, unless you think they are very related. Instead submit them separately so IC-IT can parallelize their work.
-
Subject-line: Write a clear & concise subject line that describes your problem. This will be the ticket title.
-
Email body: Report findings in the email, such as commands you have run that resulted in certain outputs. Be clear about what’s happening. For RunAI, IC-IT has specified which information would be useful to them here.
-
Email end: Thank the staff!
-
After a few minutes of sending the email, you will receive a confirmation that your ticket has been submitted.
-
You can always see the follow-up in your Demandes / Requests portal.
-
Adding Others in the Ticket: You can also add more people on the ticket by adding their email in the watch list section on the right hand-side of the ticket interface on the portal. This way they will get an email for every update just like you do. Note that CC-ing the person doesn’t always add them to the watch list, so wait to get this confirmation and add them through the portal GUI.
Here are some possible scenarios you may be stuck in and you should definitely ask for help:
- I am having permission issues on NFS: This may be because you have recently joined and your group permissions are messed up (e.g. lab unit group doesn’t show up in your unix groups due to some max group length problem, or your Dockerfile may be missing some magic user permission setting). It’s a good idea to contact IC-IT in this case.
- I need more storage than what’s available on NFS: Contact your lab admins to figure out whether it’s possible to increase this storage. A simple NFS storage increase request ticket from these people and the lab PI will solve your problem in a day or so.
- I have a multi-node job requiring inter-node communication on RunAI: To the best of our knowledge, this isn’t possible and the maximum amount of GPUs is 8 per node. However, you can have a multi-node job without inter-node communication.
Acknowledgements
Originally written for the NLP lab by Deniz Bayazit, updated to be lab-agnostic March 2023.
Thank you to the IC-IT team, LSIR, and DLAB for sharing their experiences with setting up these systems with the NLP lab. Thank you to Soyoung Oh for documenting RunAI usage for distributed runs with VSCode here. A large part of the useful RunAI commands comes from this repository. Thank you to Khai Loong Aw for the section on interactive RunAI Jupyter notebooks. Thank you to Badr AlKhamissi, Beatriz Borges, Gojko Cutura, Saibo Geng, Karina Halevy, Sepideh Mamooler, Skander Moalla, Syrielle Montariol, Khanh Nguyen, Aurelio Noca, Arina Rak, and Gail Weiss (sorted alphabetically) for their useful feedback!